
A dusty little corner of the Internet: electronics, computer hardware and software, general aviation, 1980's Mopars, and related sundry.
Automotive
 Up until around 2016 or so, I primarily drove these quirky "Turbo Mopars" employing Chrysler's 2.2L turbocharged powertrain. My last daily driver of this type was a 1986 Dodge Daytona Turbo Z C/S. The car was a bit of a basket case when I got it, but it was eventually sorted out: the frame was straightened, the floor pans replaced, and the powertrain and interior were upgraded. It was a very fun and comfortable car to drive (for a Turbo-Mopar anyway). Eventually I had to let it go, as it just wasn't practical to use a 30+ year-old car as a daily.
 My previous daily driver from 1995 through 2002 was a 1988 Dodge Shadow ES. It was laid to rest due to a fatal case paint peel and floorpan/frame rust. It had been in a few collisions over its life and it just wasn't worth saving. Prior to that, I drove a 1987 Dodge Shadow Turbo and a 1987 Plymouth Sundance Turbo. I had a thing for these particular cars (the "P-body", in Turbo-Mopar parlance), especially the first generation (1987-1988).
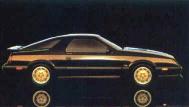
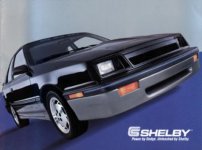 Back when I first graduated from college, I strongly desired the ultimate first-generation P-body: the 1987 Shelby CSX. After some searching and waiting for the right car in my price range, I found Shelby CSX #694 of 750. It has mainly been a project car, though it has had to step in as a daily from time to time. This is the last of these cars that I still own.
Chrysler had an interesting relationship with Carroll Shelby in the late 1980s. While the resulting vehicles were never taken very seriously in muscle car circles, a great online community did form around them. The discourse has moved from mailing lists to online Forums to (unfortunately) Facebook Groups, but the community itself still exists. The Shelby-Dodge Auto Club still holds an annual convention to this day.
In the dark recesses of the Internet lies an ancient tome of knowledge that (according to the server logs) people still visit for some reason: Mini-Mopar Resources.
The Daytona: January 20, 2003
Posted on January 20, 2003.
Had a little scare with the Daytona's engine...thought I blew it. When I pulled the fuel pressure regulator, the vacuum line appeared to be disconnected. That may explain why it was running rich, but it shouldn't run at all at 10psi of boost. Anyway, that coupled with some apparent oil coming out of the dipstick and the fact that is was missing at idle, I thought I cracked a ringland. Well, I snugged up the dipstick and after installing the new adjustable FPR, it seemed to run fine. I did a compression check and it was the same as before: about 130psi on all four. The plugged looked perfect. I guess I'm OK, but it still starts missing on one cylinder if it is left idling for a while. That Dawes Devices A/F gauge has rather dim green LEDs, so it's hard to see them in the day and I don't know if I am rich or so lean that I'm off the scale. I might just install my old Cyberdyne so I can see what is going on.
Since it is an early-style T1 intake, I had to use a universal adjustable fuel pressure regulator from FWD Performance. I managed to install it in the same location as the stock unit by grinding-out part of the bracket to clear the return line fittings. I also had to bend the short pipe for the return line on the fuel rail slightly to clear the unit. The regulator has 3 fittings: two -4 AN fittings on the bottom (outlet in the center and inlet to the side) and a 1/8" NPT pipe fitting on the side for a pressure gauge. I was lazy and just used two brass 1/4" flare fittings for the inlet and outlet. I placed an o-ring at the base of the flare fitting threads, which sealed the fitting to the regulator housing. I also used Teflon tape on the threads so the threads were not so loose. I then wedged a piece of aluminum between the two fittings so they would not turn when I installed the rest of the brass pipe fittings. I enlarged the hole in the stock bracket slightly and used the 1/4" NPT street elbow to mount the regulator to the bracket (between the elbow and flare fitting). A 1/4" NPT to 3/8" hose adapter was mounted to the elbow (inlet) and a 1/4" NPT to 1/4" hose adapter to the center flare fitting (outlet). In order to the fuel gauge fitting to face upwards, the elbow is rotated such that it is pointing somewhat towards the valve cover, similar to the stock regulator. It's a little tight between the two hose fittings, but it works and looks decent.
The CSX: January 20, 2003
Posted on January 20, 2003.
I haven't driven this car at all lately. I don't like to drive it in the winter anyway, but real reason is that the starter solenoid was dying. I knew it would go, since I got the car with no heat shield and the solenoid was all melted. Well, this weekend I swapped the starter from my old Shadow in and found that my retrofit heat shield was now gone as well. That would explain that burning plastic smell I was noticing this summer. Luckily I had bought 2 new heat shields this fall (dealer parts), so I put one of those in along with the starter.
The Daytona: January 16, 2003
Posted on January 16, 2003.
Haven't done much due to time constraints. The gas mileage is really poor, maybe due to the stock FPR being unable to dump off the extra fuel from the Walbro 192 fuel pump. Time to put the adjustable unit in, I guess. I also bought new GM "WeatherPack" connectors for the coolant and air charge temp sensors. They both have broken tabs and the coolant sensor code keeps getting set. I will also be stripping the interior from a fellow club member's '86 Laser with the same interior color. The Daytona's interior has many broken parts, so hopefully I'll be able to get one good interior from the two.
The Shadow: January 5, 2003
Posted on January 05, 2003.
Goodbye. Jason came and picked up the old girl today. I stripped everything off that I thought I could use for the CSX or maybe sell at some point. The power train came out fairly easily through the bottom. I will probably put it in the CSX before that motor seizes, while I build up a good one for it. Well anyway, it's all over now....
The Daytona: December 23, 2002
Posted on December 23, 2002.
Fixed a few odds and ends on the days I had off from work. The big thing was the driver's side door. It has a new latch, new pins and bushings, and I repaired the door jam wiring. The window still gets cocked funny on the way up, which causes it to hang up. The rubber is in really bad shape, so I'm sure that is not helping. It's nice to have a fully-working door, though. Removing the lower door pin is a real PITA. After trying several approaches, I had to Dremel part of the bottom tip off so that I could get a C-clamp in there and press it out. There is no way to punch it out with those damn Turbo Z ground effects in the way. I supported the door with rope strung over the garage ceiling rafters, looped through two holes in the door frame.

