
A dusty little corner of the Internet: electronics, computer hardware and software, general aviation, 1980's Mopars, and related sundry.
Automotive
1987 Shelby CSX #694 of 750
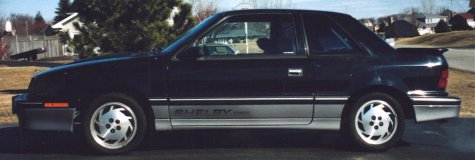
This is my 1987 Shelby CSX that I've owned since 1998. It is number 694 out of 750 that were modified at Shelby Automobiles in Whittier, California. You can read the back story here. The car has somehow survived a move and a number of life change events, however I have not really done any serious work on it for about two decades. That has recently started to change....
The CSX: August 26, 1999
Posted on August 26, 1999.
Well this new tranny appears to have a serious problem. I noticed a bad fluid leak coming from the left axle. I figured that maybe the seal went bad. So, I pulled the axle only to find the seal in good shape but the axle had a lot of play in the differential. I put a tight-fitting socket with an extension into the differential to see if the carrier bearings were shot. I could not make the differential move within the transmission case...it was very solid. Upon further inspection, I noticed that the axis on which the axle "wiggled" was on the axle shaft itself between the CV joint and the differential spline. It appears that the differential case is worn out. The axle shaft also has some wear on it. I have another axle (which actually came with the trans), which has no wear on the shaft at all. This axle was a bit more solid, but still pretty sloppy. Looks like I will have to pull the trans. ARGH!
The CSX: August 23, 1999
Posted on August 23, 1999.
Well, I have done a lot of work to the car over the past months. Basically, I have been gathering all the parts I need to replace the head on the car. The head that came on it is shot, so decided to try a reman head. Big mistake. I have never seen such crap work in my entire life! Here is a short list of what was wrong with it:
- Someone took a bad belt sander to the back of the head, ruining the sealing surface for the manifolds by putting 0.02" gouges in it. I managed to smooth the surface out by wet sanding with an orbital sander. Actually worked quite well.
- There were 2 exhaust manifold studs in there (out of 8). They came out no problem, but I had to buy a new set of those as well.
- Most of the valve train was new except for the lash adjusters which were shot, so I had to replace those.
- Then I noticed that 3 of the 4 threaded pipe connections on the thermostat housing had been drilled and heli-coiled. I'm not sure how well that is going to seal.
- The only thing that was nice was the headgasket sealing surfaces. Then I realized that the reason it must be so nice is because the head was shaved. After some measuring with the calipers, I found the head to be shaved by 0.020". I'm sure glad I have that spare 0.020" Fel-Pro head shim. Would have been nice if they put some kind of documentation with the head.
In addition to the crap reman head, I installed ARP head studs so that I can stop buying head bolts. I am also trying the MP headgasket this time. I also opted for the FM ported exhaust manifold. This along with the 2.5" exhaust system I am planning to get should make the top end pretty nice. I did weld a Products For Power 2.5" high-flow cat onto the stock down pipe. The down pipe is 2-1/4" at the turbo, but actually necks up to 2-3/8" after the first bend. This fit fairly well into the 2.5" cat without a reducer bushing. I then adapted the stock exhaust off of my Shadow as a temporary measure until I find a place to do my 2.5" exhaust.
I also pulled the trans to install a new LUK Turbo III clutch (with a Turbo II disk) I got from FM. The plan was to reset the preloads on the A520, install new seals, and toss it back in. Well, as luck would have it, I happened upon someone selling an A568 transaxle here in IL!!! An hour's drive and $550 later, I had myself the ultimate of transaxles: the A568! Thanks Gerry! He also sold me the cables and shifter. I ordered a new set of seals for it since the input shaft seal was leaking and I called FM to ask them to send me the other half of that TIII clutch I bought. I found the shifter knob and boot at a boneyard on a '92 Shadow with a A543. During the installation I found that a few mods were required, but nothing major. I will have a page up about this sometime in the future. Drop me a line if you'd like the details now.
While I was waiting for parts, I addressed the nasty water leaks in the passenger compartment. The leaks were causing the insulation and carpeting to shrink and rot. I completely GUTTED the interior, insulation and all. This car is noisy enough and I don't care about 2 or 4 lbs of weight, so I replaced the insulation with heat shield/sound deadening insulation. I also ordered a new molded carpet from Newark Auto. It was an OK fit and a mediocre color match. While it was gutted, I traced all the water leaks by sitting inside during some heavy rain. Most of the leaks were due to bad gaskets and seals. One leak was a body caulk issue, which the car may have had all of its life. I spent a lot of time cutting and gluing the insulation back in, and it feels pretty sound now. I also bought new weather stripping for the doors and had the headliner and visors reupholstered. The interior now looks quite respectable, especially since it is all Shadow ES instead of half ES, half CSX. If everything else holds up (yeah right) I will address the body next year.
The CSX: February 22, 1999
Posted on February 22, 1999.
Broke 500 miles on Friday (19th)! Woo! The engine is now broken in. I hooked up the wastegate solenoid around 400 miles and have been enjoying the power. :) The boost likes to creep to 14psi, before the computer pulls it back down to about 11psi. Luckily, I'm not hitting cutout. I guess it's time to play with restrictors again. I drove the car all the way to work on the tollways and it did just fine, aside from the bumpy ride. Here is the car as of today:
As if that weren't enough, Arlie Hart is selling a GLHS in New York to a guy in Chicago. He agreed to carry the last two panels with him, so I may have them this weekend!
The next major project will be to gut the interior again and try to find the source of my water leak. The carpeting is getting musty again and it seems to be shrinking. I'm not sure what to do with it at this point. I may have to trash it in favor of some new carpeting. It sure could use it. The headliner is another issue. I plan on buying some headliner material and gluing it on this summer as well.
The only other big problem is the suspension. It definitely needs new shocks and struts, judging by the way it hops all over the place.. I have a lead on some interesting units, otherwise I'll go with Konis or KYBs.
The CSX: February 7, 1999
Posted on February 07, 1999.
I had a burning desire to work on the CSX and I had the opportunity last Thursday (the 4th), so I put in some of the parts I had. I also pulled the valve cover and tried to quiet down the valve train by pumping up the new lifters again. While I had the cover off, I replaced the fuel pressure regulator with the adjustable unit from Rick Diogo. I also replaced the spark plugs because they were fouled from running so rich (RN12YC).
After allowing the RTV on the valve cover to cure for a couple days, I started up the engine and adjusted the fuel pressure. I brought it down to 50psi. I took it for a spin and it's running so much better...much more low-end torque. The plugs looked fine afterwards. I'm still at reduced boost, so I won't know for sure for a while. It was nice to drive it again.
The dumb thing still has a water leak somewhere. I guess the search will continue. I also installed some of the interior pieces from Arlie Hart, but I still need to get the two, large rear sail panels from him. Anyway, it looks much better with the darker trim pieces.
The CSX: January 18, 1999
Posted on January 18, 1999.
Well, I received the adjustable fuel pressure regulator from Rick Diogo. It is actually for an '89 or later turbo, but it will work just fine the and pipe connection opens up the option for a custom fuel setup. It appears to be a used unit that has been modified. An aluminum cap with the hose barb and adjustment bolt covers what is probably a cut open, stock regulator. Better than hacking and gluing with JB Weld, or crushing it in a vise, in my opinion. :) I also received the pressure isolators I ordered for the oil and fuel pressure guages that I will be installing. They look like they will do the job and I will add specifics on how to get them to the Mini-Mopar Resource Site when I get the chance. I also updated this page with a picture of the pistons and rods I used on the engine rebuild. I actually had several pictures of the rebuild, but my nice camera and the roll of film they were on met their demise while I was on vacation in December. I am annoyed.
Since it cold outside these days and the CSX is buried in a foot of snow right now, I haven't done much with it. The old battery also decided that it doesn't like cold weather and has died. I don't want to drive this car through the salty roads of a mid-west winter anyway, so it will stay where it is until spring. I will then buy a new battery, install the goodies I have been collecting, and hopefully continue the restoration if I can. I can't wait to get that ND Performance logic module in there!
My future with this car is becoming uncertain at this point because of certain events going on with my life. I hope I will be able to keep it after all this work and years of waiting to finally get one. Keep your fingers crossed for me....

